How to Create an Effective Amazon Author Page

If you have a book on Amazon.com, you need an Amazon Author Page. It’s one of the best ways to promote your work on the world’s largest bookstore. But, your publisher won’t do it for you. And, if you’re a self-published author, you definitely need to do it yourself.
But how?
In this guide, we’ll share tips on how to make the most out of your Author Page.
What is an Amazon Author Page (and Why is it Important)?
With an ever-growing list of things to do to promote your book, creating an Amazon Author Page may not seem like number one, but here’s why it matters.
An Amazon.com Author Page is your public profile as an author who sells books on Amazon. The Author Page is part of your Author Central account.
Never heard of Author Central? Author Central is your central hub on Amazon.com. Through Author Central, you can track your book sells, get tech support via phone or email. Other benefits to setting up your Author Central account on Amazon is the ability to add editorial reviews, see any reviews that readers have left, and then respond to those reviews.
But perhaps the most important reason to sign up for an Author Central account is so that you can set up your Author Page.
You may be wondering why it’s important to create an Author Page in the first place.
Isn’t it enough to have your books on Amazon? Do you really need to attach a public profile to your books?
The reason you need an Author Page is the same reason why you need to include a blurb on the back cover of your book, create a website, or maintain a presence on social media: Your readers want to connect with you. They want to know what you look like, what your interests are, and what other books you may have written. In short, they want to learn more about you, and your Author Page shares vital information that they’re looking for.
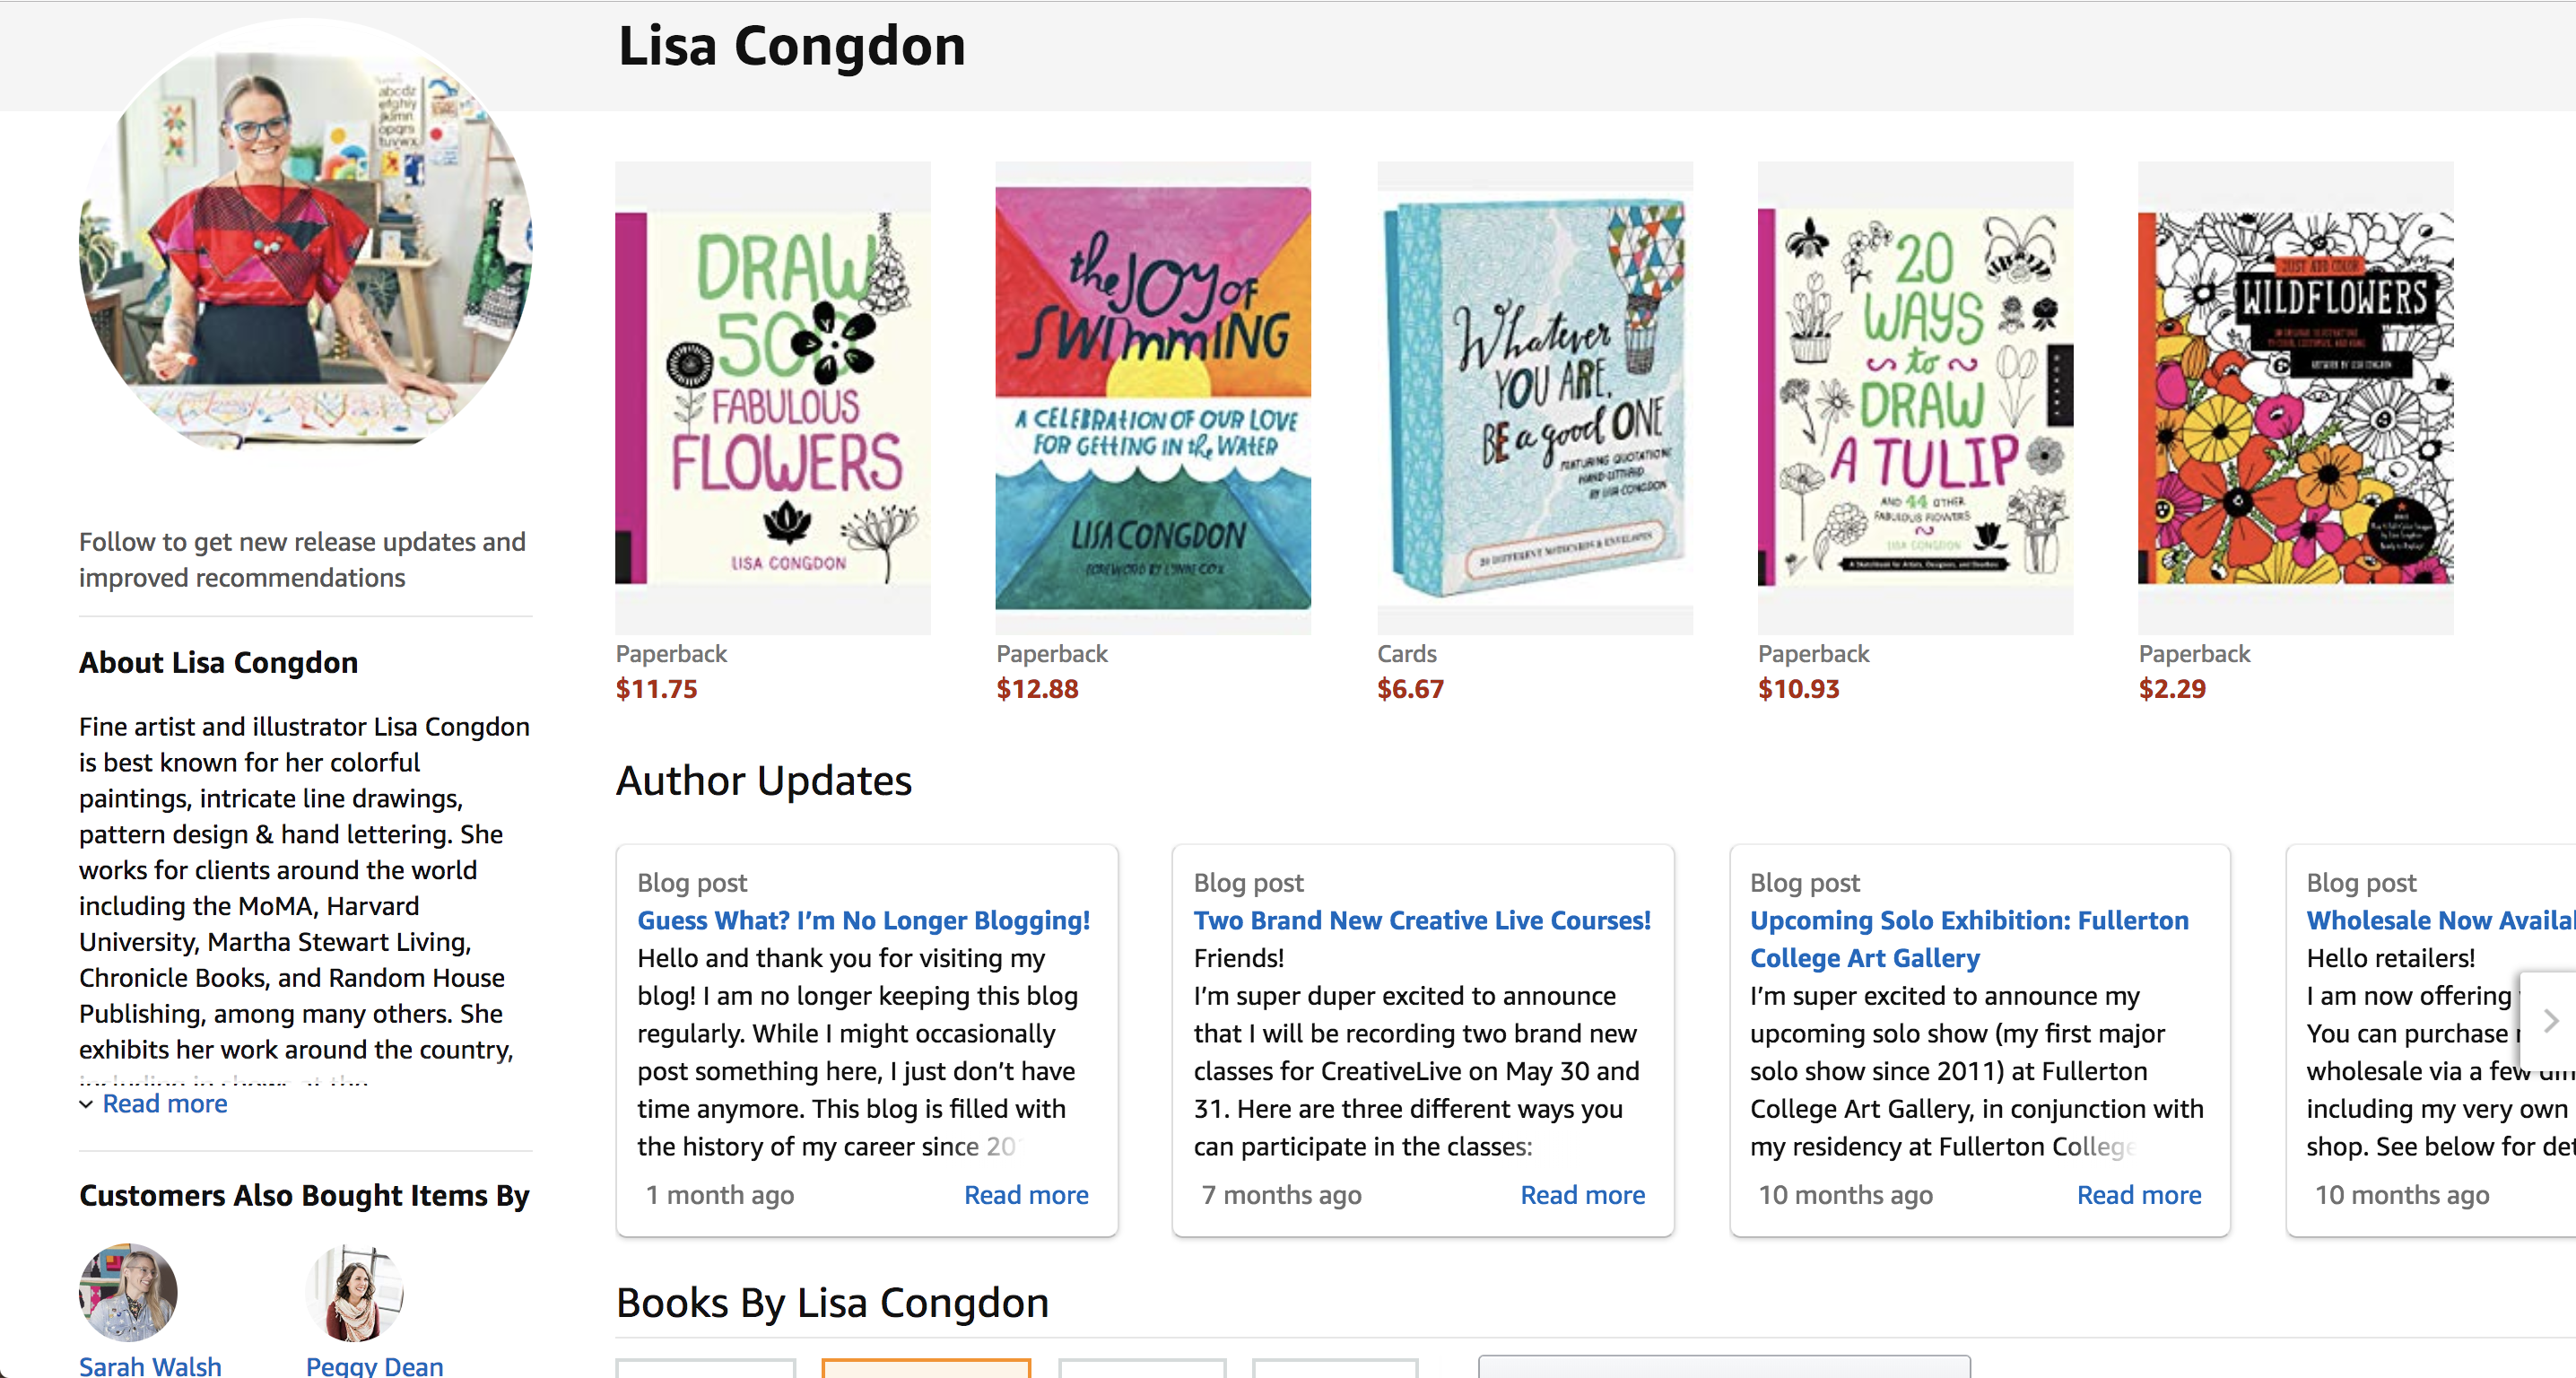
Here’s an example of an Author Page from Lisa Congdon:
Here are a few more reasons why you should create an Author Page:
Increased legitimacy as an author - Your author profile shows that you are a professional writer who takes your work seriously.
Introduce yourself as an author - You can share tidbits of yourself that will be interesting to your readers.
Provide updates - You can let your readers know about upcoming events, like book tours or speaking engagements.
Link to your blog - Drive traffic to your blog from Amazon. You can link your blog feed to your Author Page and share snippets of your blog posts automatically.
Add a book trailer - Get people excited about your book with the help of a video preview. Check out tips on how to create a book trailer here.
Show what else you’ve written - Your Author Page will show all of the other books you’ve written. If a reader loves one of your books, they’ll want to read more.
Get the “follow author” button - Invite readers to receive your updates by enabling a “follow author” button. It’ll go under your books and on your Author Page. You can only get this feature by signing up for an Author Central account.
Direct them to your website and social media profiles - Use your Author Page to link back to your website, blog, and social media profiles. Encourage interested readers to follow you outside of Amazon. This is how you’ll build an engaged community or fanbase.
Go here to set up your Amazon.com Author Central account.
How to Create a Biography for Your Amazon Author Page
Your bio is the main star of the show on your Author Page. But if the idea of crafting a bio doesn’t thrill you, here are a few tips to help you kill it:
Third person isn’t always the best person - While the default point of view for bios is usually third person, there’s no law against writing in first person for your bio. Heck, there’s even a good argument for writing in second person. Imagine how interesting that would be for the reader. Write your bio is both first and third to determine which point of view is best.
Write for your reader - Remember who’s most likely to read your bio: your audience. Write a bio that speaks directly to them. Some authors even lure readers back to their website and mailing list by offering a gift (such as a free chapter).
Proofread your bio - You definitely don’t want typos or spelling errors in your bio. Readers are easily distracted by errors in your text.
Ask someone to read your bio - There are two benefits of asking someone to read your bio: They’ll catch typos that you didn’t catch yourself and they’ll be able to tell you if the bio is interesting or not.
Toot your own horn - Share your achievements with your readers or show them why you are qualified to write about your subjects. Don’t be shy. Shove every relevant award, accolade, or honor that you’ve received into your bio. If your bio is award-heavy, it may be best to write in third person. It’s a lot easier to boost when you’re writing in third person (i.e. “he earned X” or “she won Y”) instead of first person (i.e. “I’m awesome”).
Share the highlights - You don’t have space in your Amazon bio to recount your entire life story, so just focus on the highlights. Share your hobbies, your guiding principles, and a brief blurb about your family.
Subscribe to receive this extra resource.
Connect Books to Your Author Page
Once you have an Author Page, you can start linking books to your profile right away. It may take a few days for the books to show up on your account, though. Sometimes, Amazon has to verify book ownership with your publisher (if you have one).
To add books to your profile, navigate to the Books tab in your Author Central and click “Add more books.” Then, search for your books by your name, your book title, or the ISBN.
Be sure to link every version of your book to your Author Page, including hardcovers, paperbacks, ebooks, and audiobooks.
Don't Forget to Optimize Your Book Descriptions
Use your book descriptions to pull in potential readers and sell them on your story. You’re a storyteller and you’ll prove that with a killer book description.
After attaching your books to your author profile, you can include editorial reviews (more on that next) and a description for each book. This is exciting because your book description will help new readers find your work.
How?
With keyword phrases.
You’ll include keyword phrases within your book description. Keyword phrases are words that you predict Amazon readers will use to find your book from a typical search, i.e. “travel memoirs by women” or “mystery adventure.”
But on Amazon, your book description isn’t just about the words you choose. It’s also about the way the words look on the page.
Remember that your book descriptions appear in two important places: on the book’s page and also on your Author Page. Your description needs to appeal visually to capture the scanning page visitor.
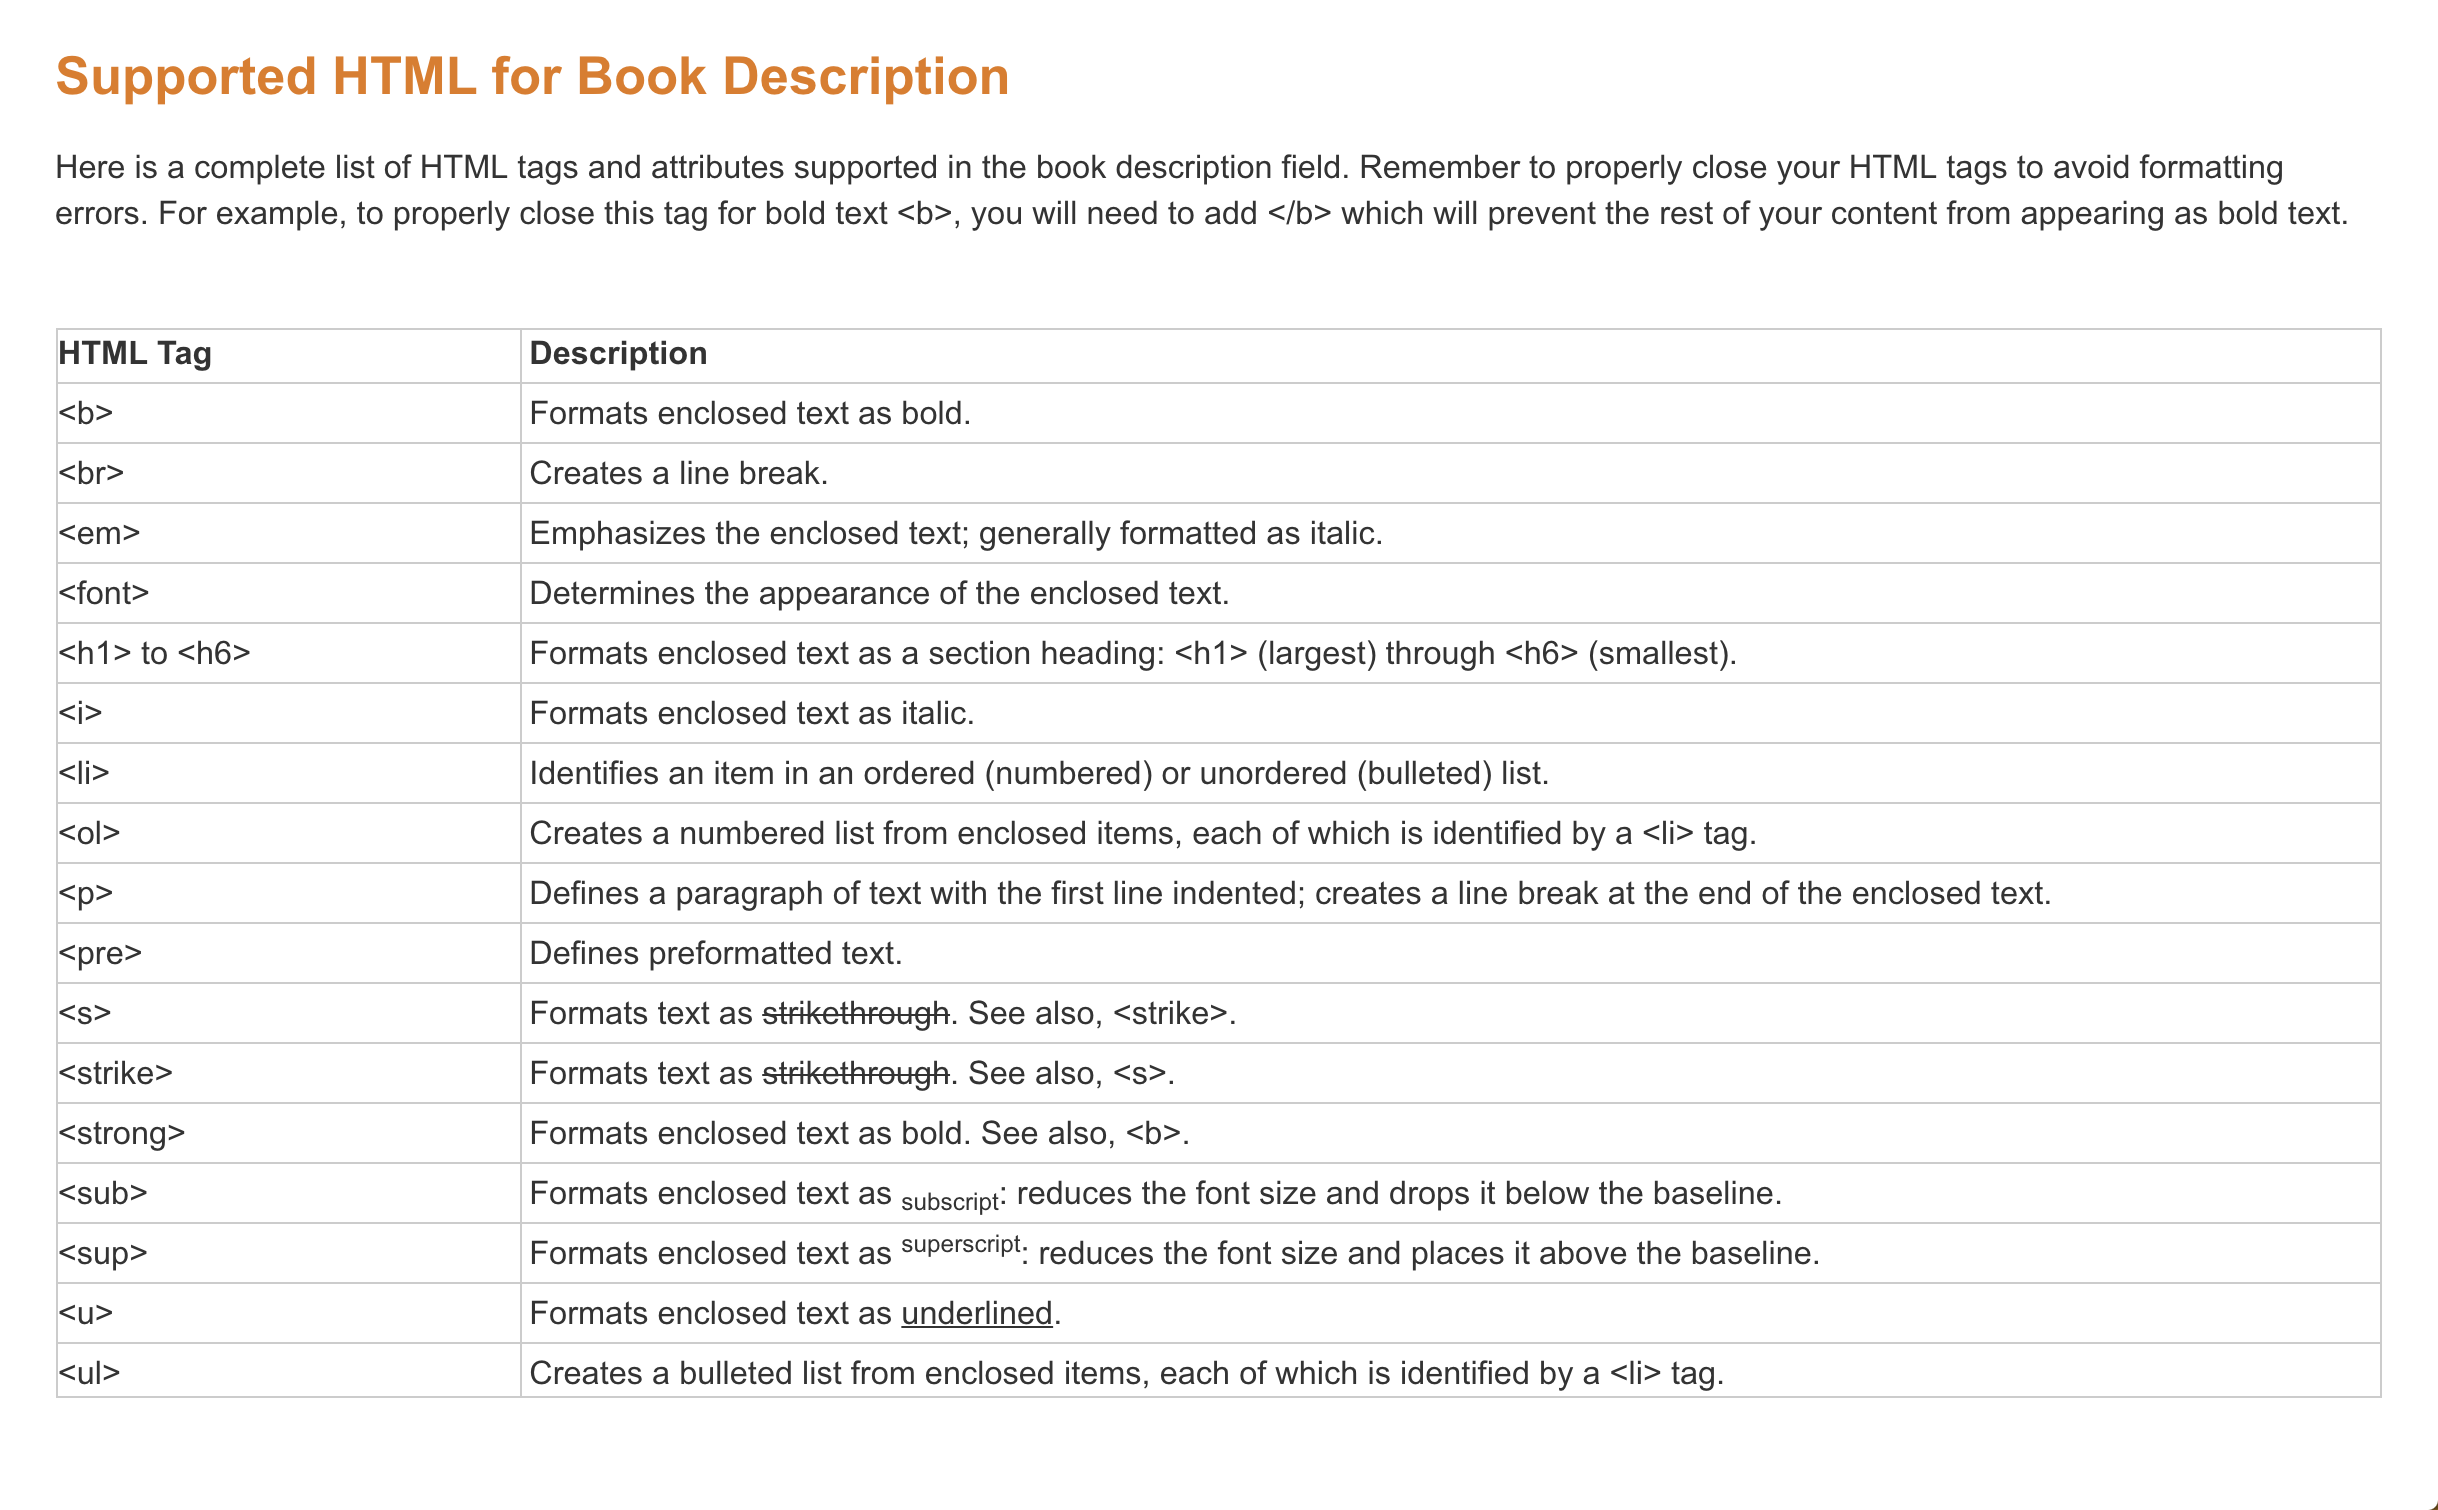
Fortunately, Amazon has made it easy to do so. You can enrich your text with HTML code that makes it more scannable. Make text bold, add bullets, underline, switch up the font size, and more. Here’s a list of the code you can use to spice up your book description text:
If you’re not comfortable with using coding on your own, use this nifty Amazon book description generator from Kindlepreneur.
Check out these examples of scannable book descriptions:
Add Editorial Reviews to Your Author Page
Another key feature to take advantage of is editorial reviews. You have the ability to add your own editorial reviews to your books. For example, you may populate this section with reviews from early readers who received an advanced copy of the book. This section features prominently on the book’s page (before the reader has a chance to scroll to the main reviews), so it’s valuable real estate. Fill this space with glowing reviews that may persuade the reader to buy your book.
Create Multiple Author Central Pages
Despite its name, the Author Central is not truly central. You may have noticed that Amazon has multiple international sites, such as UK, France, and Japan. To increase your visibility, you need a separate Author Central account for each of these international sites.
While it’s easier to copy and paste your bio from one site to the next, I challenge you to switch it up a bit, as Neil Gaiman does here:

Image Courtesy of Amazon.co.uk
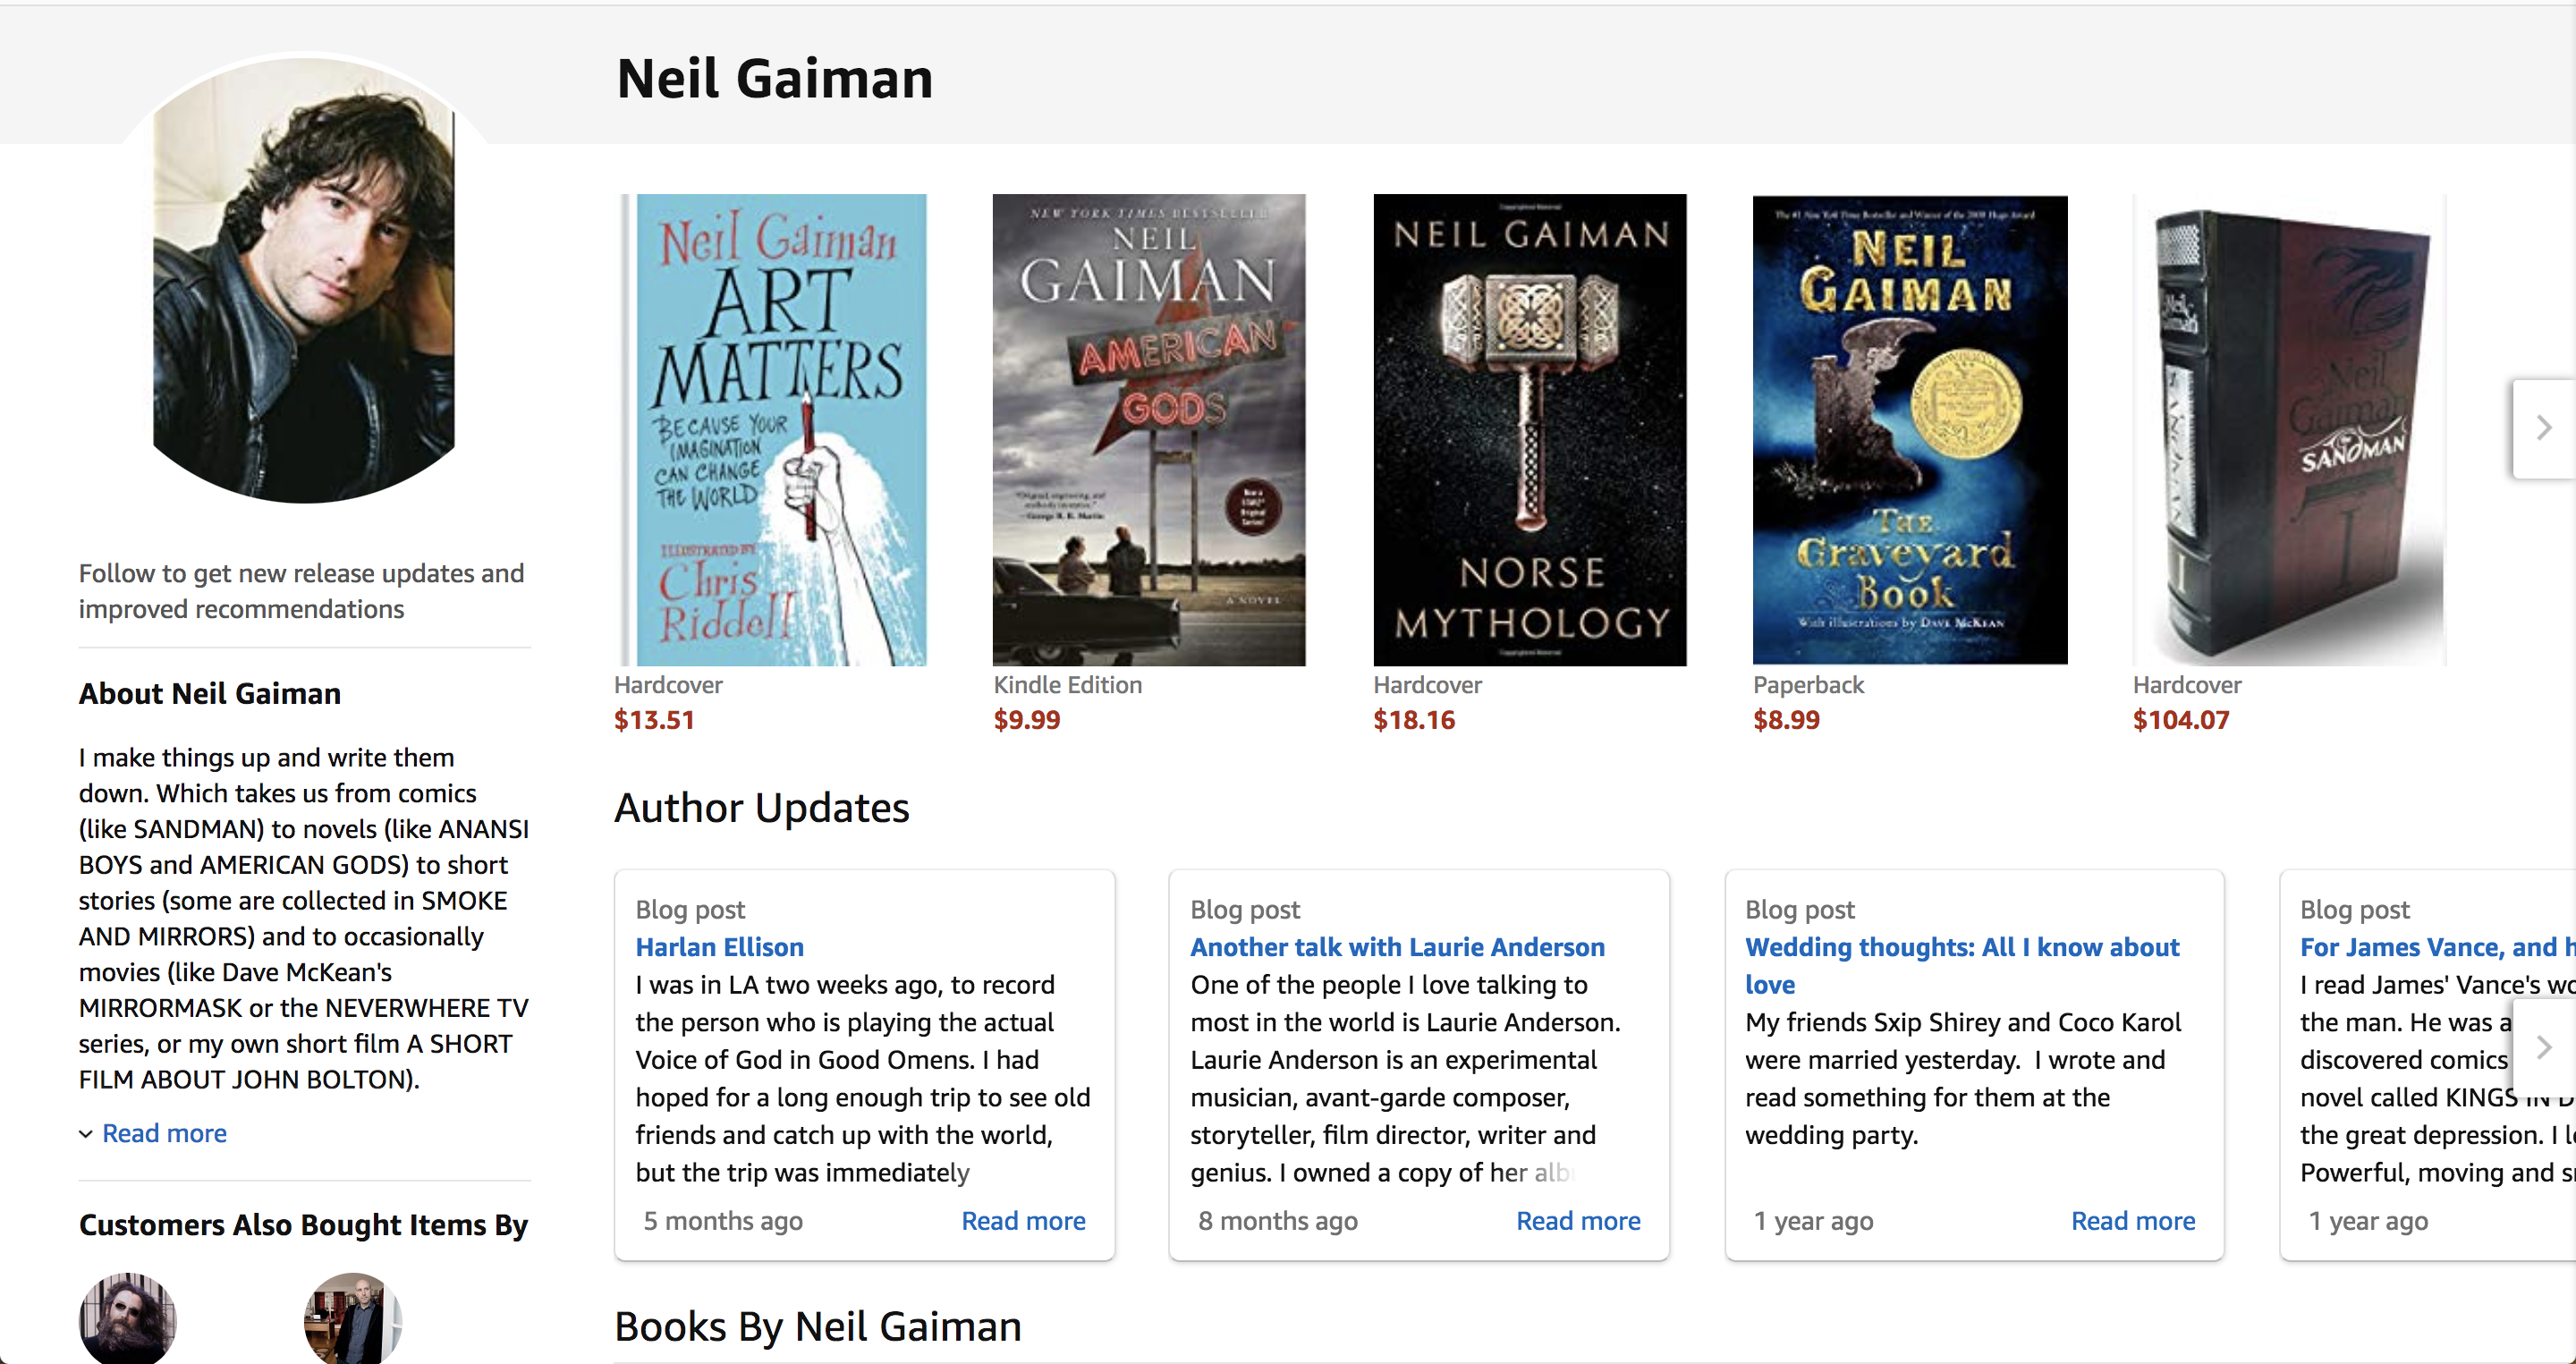
(Psst… Did you notice that he switched points of view for the bio?)
To set up your Author Central accounts, click on the links below:
Next Steps
Now that you’ve come to the end of this post, here’s what to do next:
Set up your Amazon Author Central (United States) account here.
Create a book description with HMTL code for you to copy and paste here.
Share your Author Page with us in the comments below!
Subscribe to receive this extra resource.


